I thought it might be useful for members to have something to refer to when¬¬ considering replacement or alternative rims and or tyres for their cars.
This might ramble on a bit because it occurs to me to integrate with the “facts” a few observations and things to look out for over the life of your tyres.
So, here’s some introductory information.
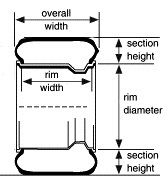
RIMS: I’ll only concern myself here with sizing and how that relates to tyre selections and fitment.
Diameter: In these examples from 15” up through 16” and 17”. You can go further but that’s a rather individual decision and brings into play a heap of extra considerations best discussed separately and specifically.
Width: 15” are 5.5 standard fitment.
16” are 6.0” standard fitment. Needs confirmation.
17” are 7.0” standard fitment. Needs confirmation
Each of these diameters can be obtained in wider sections. For instance my 15” std steel wheels have been replaced with 6” alloys which IMHO is the optimum fitment for the standard 195/65R15 tyres.
The width is determined by measuring INSIDE the rim flanges which the tyre beads seat up against to prevent spreading over the rim. The flat section inside this flange is the other surface the tyre sits on and that’s where the diameter is measured from.

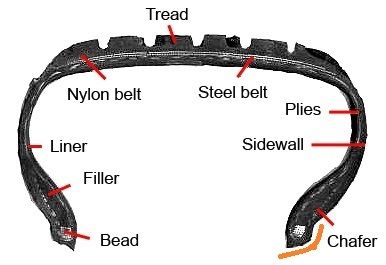
You may notice there’s a slight ridge or rib in this section, running around the rim. This is what defines a tubeless rim and is designed to keep the tyre from peeling off the rim in low pressure situations in sideways distortion. eg. A sudden swerve or panic braking while the wheels are on full lock. Either situation will result in the tyre trying to maintain its forward motion while the rim turns inside it, causing extreme distortion in the sidewall.

The orange bit shown just inside the word “Chafer” on this diagram highlights the two surfaces of the bead which are in contact with the rim. Note the bead looks like it is several hoops of wire. In fact it is one long strand of rubber encased high tensile wire which is looped several times – an infinitely stronger option than separate loops. It is virtually impossible to break a bead but it can be kinked during transport if pulled down by a rope or cable.
I’ve never seen a tyre roll off a rim in this situation except once many years ago when I was spectating at a rally and a guy in a Lancia Beta used a handbrake turn to negotiate a tight hairpin corner (on hard packed red clay). There was a loud bang as a tyre pulled away from the rim. I talked to him later and he admitted he had imported some alloy rims from Italy and they weren’t tubeless. But he was running his rally tyres tubeless.
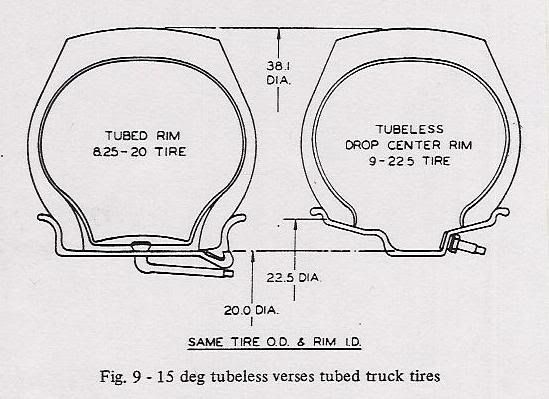
These are two examples of truck tyres. It was the best pic I could find to demonstrate the difference between tube type and tubeless tyres and rims. The tube type is a two or three piece rim, hence the flat centre. We won’t worry about them here. The tubeless tyre beads (and the rim in the bead seating area) are tapered at about 15°. The tubeless rim also has a “drop centre” which aids in fitting the tyre onto the rim. You pull the bead up into the drop centre well and that lets the opposite side slide over the rim flange.

Another bit of information about the mating of tyres and rims. The bead area is the first of several very clear tell-tale areas which indicate if a tyre has been run underinflated. The outer face in particular will be highly polished, because low pressure allows the rubber and metal to rub against one another, causing overheating and melting of the rubber surface. So, if your tyre has “just blown out” a tyre technician will look closely at this area when he dismantles the remains. A highly polished, almost mirror finish indicated excessive flexing at low pressures over an extensive period of time. Which will lead to the melting of the sidewall cords.
Design Rim and Rim Range: More to come.Just adding to this.
Every tyre has both a "design rim" and a "rim range"
Some markets apparently call the design rim a "measuring rim"
Anyway, tyres need to be fitted to a design rim for taking the measurements which confirm its size as stated on the sidewall. eg. 195/65R15.
However, each tyre has a certain amount of tolerance as to what rim it can be fitted to in actual service. Generally the design rim will fall somewhere in the middle of the rim range, but not always exactly. Whilst it is physically possible to fit tyres to rims outside this range, doing so will seriously reduce the effectiveness of the tyre. If the rim is too wide, the sidewalls of the tyre are unable to flex to the limits for which they have been designed. The most obvious downside of this is a noticeably stiffer ride. And with less flex the footprint of the tyre (the part of the tread which is in contact with the road) can be reduced.
By going the other way and fitting a tyre to a rim which is too narrow, you create too much flex in the sidewalls. This can result in instability at speed in a straight line as the tread actually moves around on the road. In cornering or braking situations the footprint will distort and not provide the grip you need in an emergency.
As an aside, too high or too low tyre pressures can have the same effects as the wrong size rims. And uneven tread wear is the most obvious result in all the above options.
In addition, too low a pressure or too narrow a rim can contribute to cracking in the sidewalls, down low, close to the bead.
I'll see if I can dig up some of my old "footprint" photos to give a better view of what's keeping your car on the road.TYRES: Let’s begin with tyre sizing. eg. 195/65R15. Some older tyres will have a “P” in front of the 195 to designate it’s a passenger tyre but this isn’t used these days. To take these measurements, a tyre must be fitted to its “design rim” at the recommended pressure and allowed to sit for 24 hours.
195 refers to the width of the tyre between the sidewalls in millimetres. It would be fitted to a 6” wide rim. Manufacturers have a certain amount of leeway in this. Could be a couple of mm either way.
65 is the height of the sidewall from bead seat to tread expressed as a % of the tyre width.
“R” simply denotes the tyre is a radial.
And obviously 15 is the rim diameter in inches.
The observant among you will note the combination of metric and imperial measurements. It is what it is.
There are two other markings which are important. One is the Load Index and the other is the Speed Rating.
LOAD INDEX:
Some examples of what you might find on a passenger tyre.
Load Index 81 82 85 86 87 88 90 92 95 96
Max Load/tyre (kg) 462 475 515 530 545 560 600 630 690 710
To explain this, let’s look at 88. This means that the maximum load this tyre can carry is 560kgs. This is at the maximum pressure for this tyre. Some have that pressure on the sidewall but the ATRMA Manual gives charts for every sized tyre and it’s acceptable pressures. Remember, it’s not the tyre which carries a load but the air inside it. So, increasing the tyre pressure increases the load.
You might think that 560kgs by 2 (an axle) is way more than you need. BUT! You have to consider weight transfer under braking, turning or accelerating. PLUS! What if you are under a panic stop and you run through a dip in the road. That increases the weight on those tyres, albeit briefly, dramatically. Then, think about the rear, with maybe a trailer on. There is a weight transfer onto the drawbar, plus THEN you hit that dip.
So, Load Index is critical and you CANNOT fit a tyre to your car (at least in Australia) which has a lower Load Index than that on your tyre placard.
SPEED RATING:
There are many, however these are the most common.
Speed Symbol Max Speed kph.
S 180
H 210
V 240
Z* 240
• Refer to manufacturers for more information on this.
As with load ratings, speed symbols are over engineered. However, AFAIK, at least in Australia, you can fit a lower speed rating tyre to your car. There is supposed to be a sticker attached advising of this but I don’t know if they bother any more. Of course, it makes sense NOT to downgrade your speed rating.
At this point I’m going to post what I’ve got here but will add more from time to time. I’ll make this a “Sticky” and whenever I add something I’ll change the topic title to reflect it.
Eg. “Tyre and Rim Information (Update One/ Two etc)”.
